
Connect Desktop Apps to Self Photos MCP
Start the service on Self Photos’ MCP page, then connect your desktop app using the steps below.
Connection address:
127.0.0.1in the examples refers to the machine running the client. On another device on the LAN, replace it with the LAN IP of the computer running Self Photos, provided the MCP service accepts LAN connections and its port is reachable.
Before you start
- Start the service on Self Photos’ MCP page.
- Copy the server URL and
headers.Authorizationvalue from the configuration JSON. - Add and enable
selfphotosusing the steps below, then confirm that it is connected.
Replace placeholders in the examples with the matching field values. Keep access tokens private and update each client after rotating a token.
Desktop app setup
Qianwen Office (千问办公)
Open Connectors → Add → Paste JSON configuration, then save. Replace the Authorization placeholder with the value of headers.Authorization from the Self Photos configuration JSON:
{
  "mcpServers": {
    "selfphotos": {
      "type": "http",
      "url": "http://127.0.0.1:17238/mcp",
      "headers": {
        "Authorization": "<copy headers.Authorization from the Self Photos configuration JSON>"
      }
    }
  }
}
Doubao Work (豆包工作)
Open Plugins · Skills · Partners → Add → Create custom connector and enter:
- Name:
selfphotos - Type: HTTP
- URL:
http://127.0.0.1:17238/mcp Authorization: copy theheaders.Authorizationvalue from the Self Photos configuration JSON
Save and enable the connector.

ChatGPT
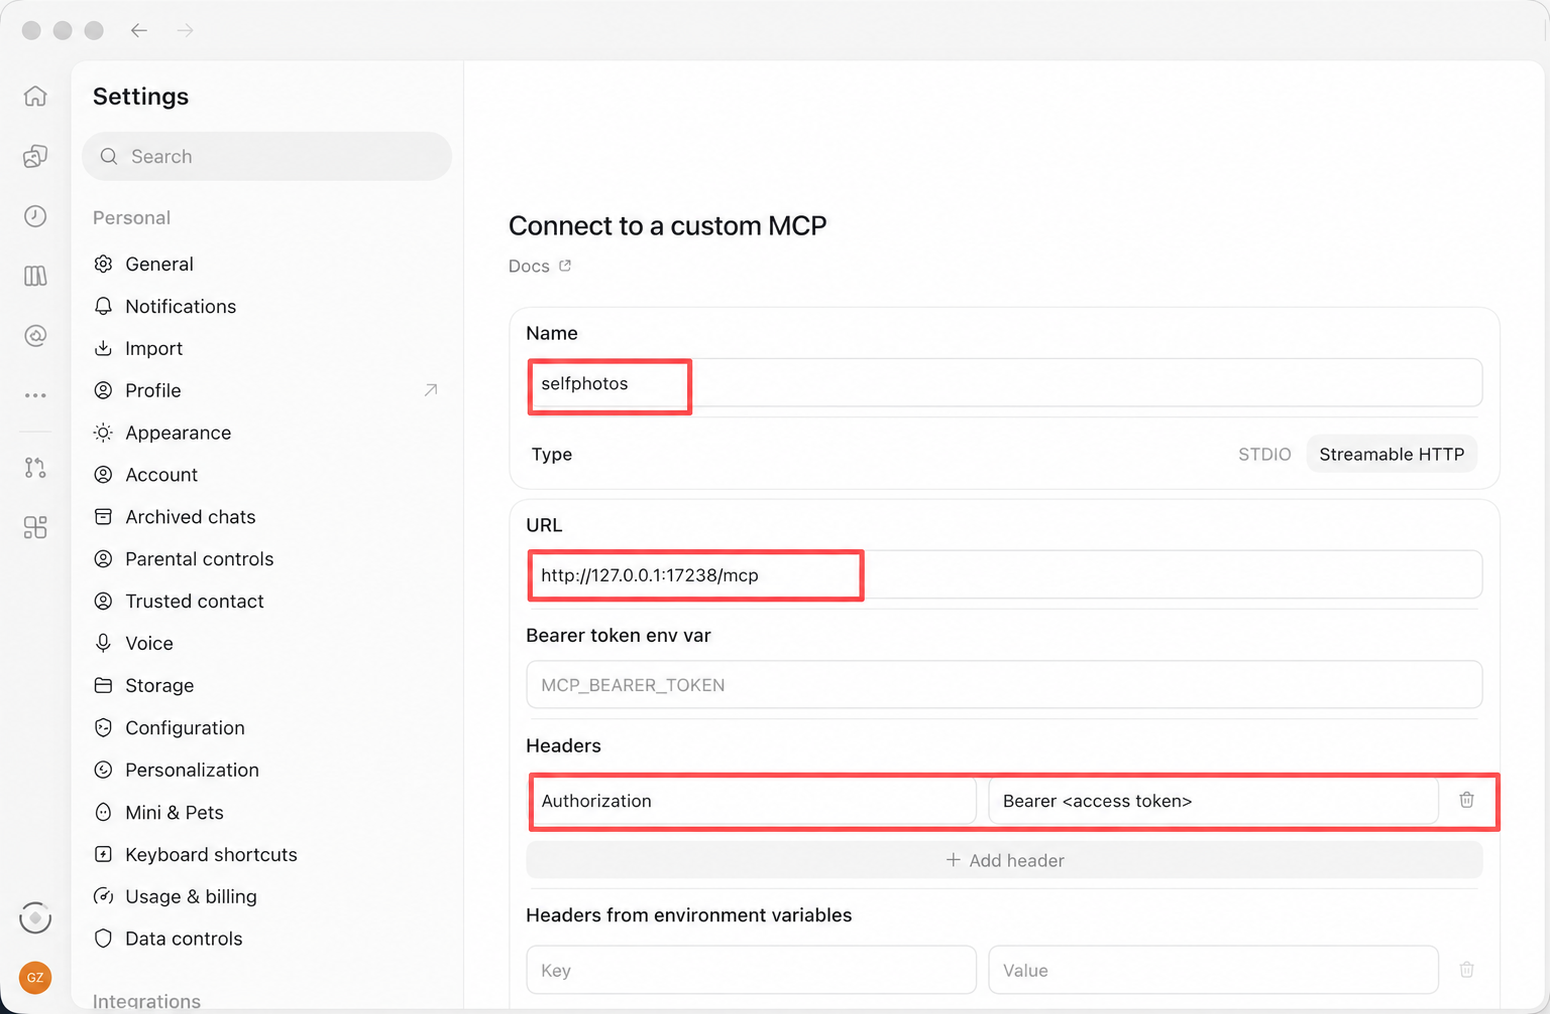
In ChatGPT desktop, open Settings → Plugins → Add → Add MCP Server and enter:
- Name:
selfphotos - Type: Streamable HTTP
- URL:
http://127.0.0.1:17238/mcp - Under Headers, add
Authorizationand paste theheaders.Authorizationvalue from the Self Photos configuration JSON into its value field - Bearer token environment variable: leave blank; do not enter the token here
Save and confirm the connection.
Official guide: ChatGPT MCP.
Claude Desktop
- Open Settings → Developer → Edit Config to open
claude_desktop_config.json. - Add the
selfphotosentry to the existing JSON. If it already has anmcpServersobject, merge the entry into it. - Quit and restart Claude Desktop.
{
  "mcpServers": {
    "selfphotos": {
      "command": "npx",
      "args": [
        "-y",
        "mcp-remote",
        "http://127.0.0.1:17238/mcp",
        "--header",
        "Authorization: <copy headers.Authorization from the Self Photos configuration JSON>"
      ]
    }
  }
}
Config files:
- macOS:
~/Library/Application Support/Claude/claude_desktop_config.json - Windows:
%APPDATA%\Claude\claude_desktop_config.json.
Official guide: Connect local MCP servers.
WorkBuddy
Open Expert → Skills → Connectors → Custom Connector → Add MCP and enter this configuration.
After saving, select Custom Connector again, then trust and open it:
{
  "mcpServers": {
    "selfphotos": {
      "type": "http",
      "url": "http://127.0.0.1:17238/mcp",
      "headers": {
        "Authorization": "<copy headers.Authorization from the Self Photos configuration JSON>"
      }
    }
  }
}
Config files:
- macOS:
~/.workbuddy-ai/mcp.json - Windows:
%USERPROFILE%\.workbuddy-ai\mcp.json.
Official guide: WorkBuddy Connector.
Cherry Studio
Open Settings → MCP → Add → Import from JSON, import this configuration, and enable the server:
{
  "mcpServers": {
    "selfphotos": {
      "type": "http",
      "url": "http://127.0.0.1:17238/mcp",
      "headers": {
        "Authorization": "<copy headers.Authorization from the Self Photos configuration JSON>"
      }
    }
  }
}
Then open Work → Agent menu → Edit → MCP and enable the server for the Agent that should use Self Photos.
Official guide: Cherry Studio MCP.
VS Code (Copilot)
Open Preferences → Profiles → MCP Servers and enter the configuration. Save, then run MCP: List Servers and start selfphotos.
{
  "servers": {
    "selfphotos": {
      "type": "http",
      "url": "http://127.0.0.1:17238/mcp",
      "headers": {
        "Authorization": "<copy headers.Authorization from the Self Photos configuration JSON>"
      }
    }
  }
}
Config files:
- macOS:
~/Library/Application Support/Code/User/mcp.json - Windows:
%APPDATA%\Code\User\mcp.json
Official guide: VS Code MCP · VS Code
Cursor
In Code or Chat mode, open Customize → MCPs → New MCP Server, paste the configuration, and save.
{
  "mcpServers": {
    "selfphotos": {
      "url": "http://127.0.0.1:17238/mcp",
      "headers": {
        "Authorization": "<copy headers.Authorization from the Self Photos configuration JSON>"
      }
    }
  }
}
Config files:
- macOS:
~/.cursor/mcp.json - Windows:
%USERPROFILE%\.cursor\mcp.json
Official guide: Cursor MCP
OpenCode
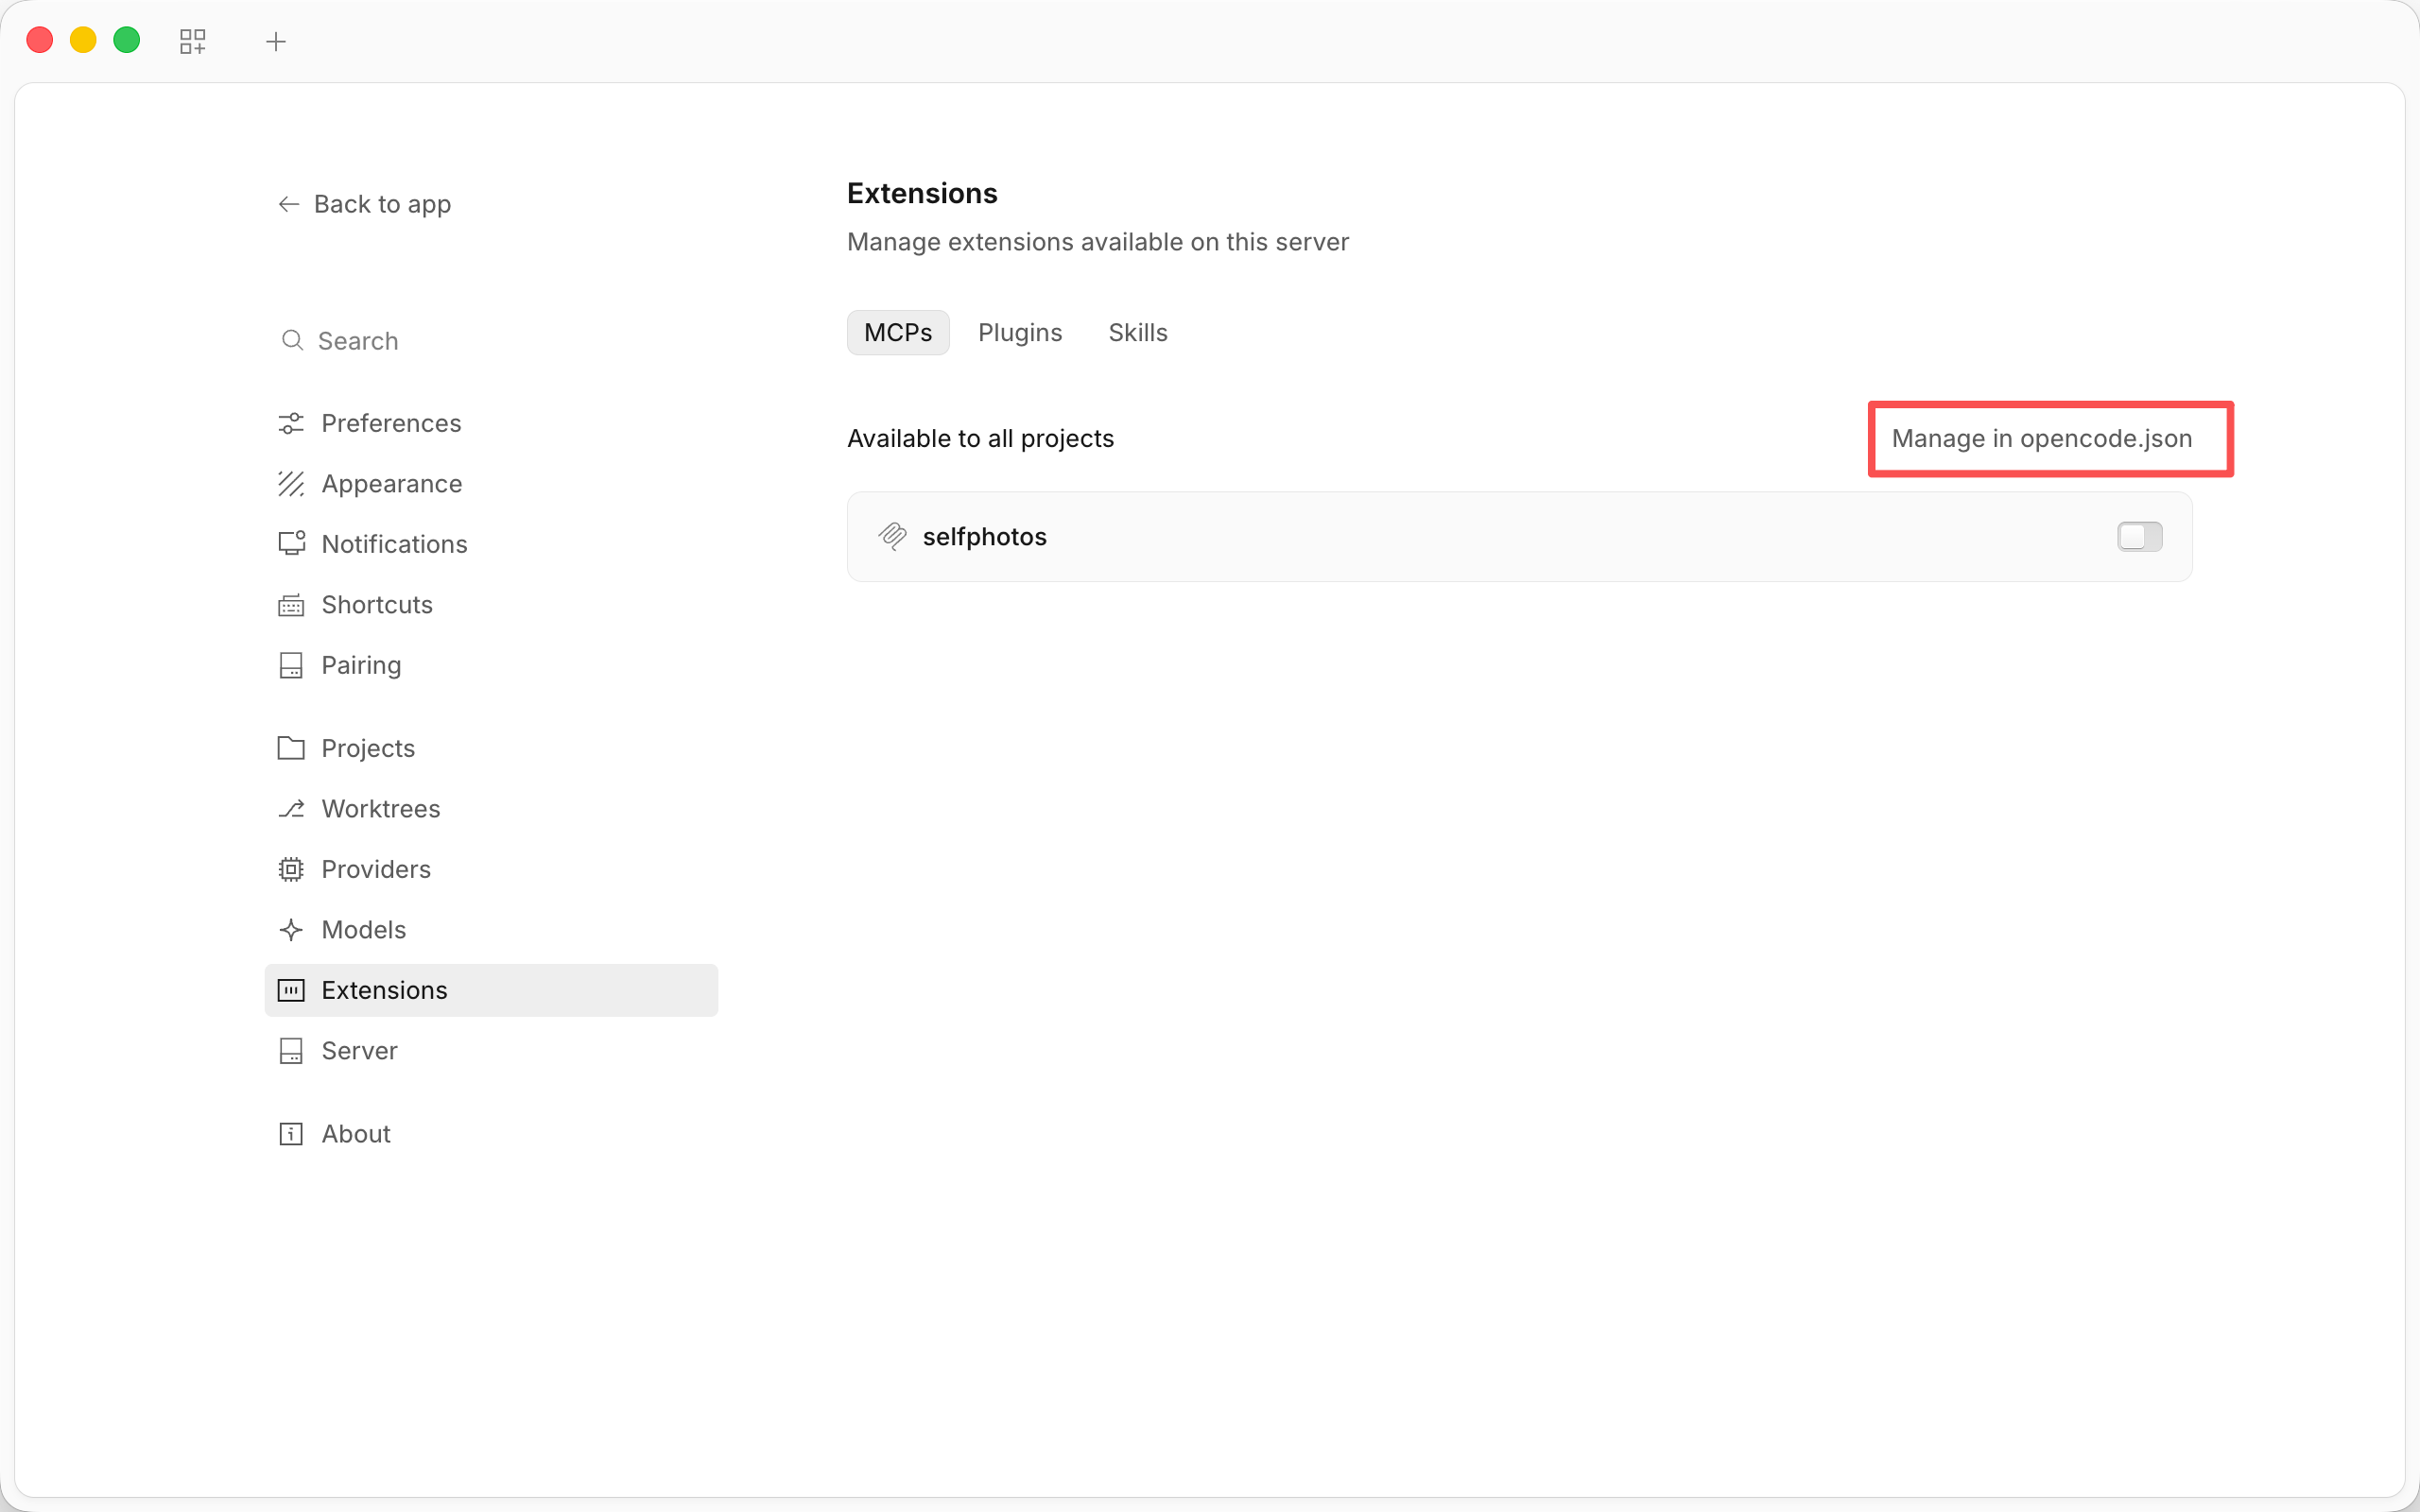
Open Home → Settings → Extensions → MCP → Manage in opencode.json, merge the configuration into the existing mcp object, save, and confirm the connection.
If Manage in opencode.json cannot be clicked, open and edit the file directly using the configuration file path below.
{
  "mcp": {
    "selfphotos": {
      "type": "remote",
      "url": "http://127.0.0.1:17238/mcp",
      "headers": {
        "Authorization": "<copy headers.Authorization from the Self Photos configuration JSON>"
      },
      "oauth": false
    }
  }
}
Config files:
- macOS:
~/.config/opencode/opencode.json - Windows:
%USERPROFILE%\.config\opencode\opencode.json
Official guide: OpenCode MCP
TRAE / TRAE CN
Open Plugin Market → Manage → MCP → Add → Add Manually, paste the configuration, and enable the server.
{
  "mcpServers": {
    "selfphotos": {
      "url": "http://127.0.0.1:17238/mcp",
      "headers": {
        "Authorization": "<copy headers.Authorization from the Self Photos configuration JSON>"
      }
    }
  }
}
Official guide: TRAE · TRAE CN
CodeBuddy
Open Settings → MCP → Configure MCP in the right sidebar, paste the configuration, and enable selfphotos.
{
  "mcpServers": {
    "selfphotos": {
      "type": "http",
      "url": "http://127.0.0.1:17238/mcp",
      "headers": {
        "Authorization": "<copy headers.Authorization from the Self Photos configuration JSON>"
      }
    }
  }
}
Config files:
- macOS:
~/.codebuddy/mcp.json - Windows:
%USERPROFILE%\.codebuddy\mcp.json
Official guide: CodeBuddy MCP
Qoder
Open Settings → Extensions Manager → Connectors → + → JSON and add the configuration. If prompted, trust and open the connector.
{
  "mcpServers": {
    "selfphotos": {
      "type": "http",
      "url": "http://127.0.0.1:17238/mcp",
      "headers": {
        "Authorization": "<copy headers.Authorization from the Self Photos configuration JSON>"
      }
    }
  }
}
Config files:
- macOS:
~/.qoder/settings.json - Windows:
%USERPROFILE%\.qoder\settings.json
Official guide: Qoder MCP · Qoder
Devin Desktop (legacy Cascade)
In legacy Cascade, open Customize → MCPs → + → New MCP → Import JSON and import the configuration. This setup applies to Cascade; Devin Local uses a different configuration method.
{
  "mcpServers": {
    "selfphotos": {
      "type": "http",
      "url": "http://127.0.0.1:17238/mcp",
      "headers": {
        "Authorization": "<copy headers.Authorization from the Self Photos configuration JSON>"
      }
    }
  }
}
Config files:
- macOS:
~/.config/devin/mcp_config.json - Windows:
%APPDATA%\devin\mcp_config.json
Official guide: Cascade MCP
ZCode
Open Settings → MCP Servers → New → JSON, paste the configuration, and save.
{
  "selfphotos": {
    "type": "http",
    "url": "http://127.0.0.1:17238/mcp",
    "headers": {
      "Authorization": "<copy headers.Authorization from the Self Photos configuration JSON>"
    }
  }
}
Config files:
- macOS:
~/.zcode/cli/config.json - Windows:
%USERPROFILE%\.zcode\cli\config.json
Official guide: ZCode MCP
Troubleshooting
The server does not connect
Confirm the Self Photos MCP service is running and check the address, port, and /mcp path. From another device, use the Self Photos computer’s LAN IP and check the service’s listening address, firewall, and network connectivity. In a container, remote workspace, or cloud agent, 127.0.0.1 refers to that execution environment; use a service address reachable from there.
Authentication fails
Copy the full headers.Authorization value from the current Self Photos configuration JSON into the client’s Authorization header, replacing the example placeholder. Save and reconnect. In ChatGPT, use the header value field and leave “Bearer token environment variable” blank.
The connection stopped working after token rotation
Update every connected client with the new headers.Authorization value from the configuration JSON, save, and reconnect. If a client still uses the old configuration, reload it or restart the client.